
Wheel Fitment Guide: How To Check Wheels Before you Buy
To check wheel fitment, match the bolt pattern, center bore, diameter, width and offset, then confirm brakes, suspension, tire clearance, load rating and hardware. This wheel fitment guide gives you a purchase checklist. Diameter alone cannot prove that a wheel will fit the hub or clear the brakes. It tells you nothing about load capacity.
Start with your current wheel markings and vehicle manual. Use the wheel offset calculator to compare positions, then confirm the physical interfaces before ordering. Record front and rear setups separately if your car uses different sizes.
Wheel fitment checklist at a glance
A complete wheel fitment check covers the mounting interface, wheel dimensions, moving clearances and load capacity. Gather the vehicle spec, current wheel size and proposed wheel details first. Confirm each item with the relevant maker or installer before mounting tires, especially if the brakes or suspension have changed.
| Check | What to confirm |
|---|---|
| Bolt pattern | Correct lug count and exact pitch-circle diameter. |
| Center bore | Compatible hub diameter, depth and centering system. |
| Diameter and width | Suitable wheel size and approved tire pairing. |
| Offset and backspacing | Acceptable inner and outer wheel position. |
| Brake and suspension | Room for calipers, struts, arms and balance weights. |
| Body and steering | No contact through steering and suspension travel. |
| Wheel load rating | Documented capacity suitable for the application. |
| Tire spec | Approved rim width, size, load and speed rating. |
| Fasteners | Correct seat, thread, engagement and usable length. |
| Final confirmation | Manufacturer approval, brake template and test fit as needed. |
What wheel fitment means
Wheel fitment describes how a wheel and tire assembly mounts to a vehicle and clears nearby parts during use. It includes bolt pattern, center bore, wheel size, offset, tire size and hardware. It must meet the load rating too. Check that it clears parts through steering and suspension travel.
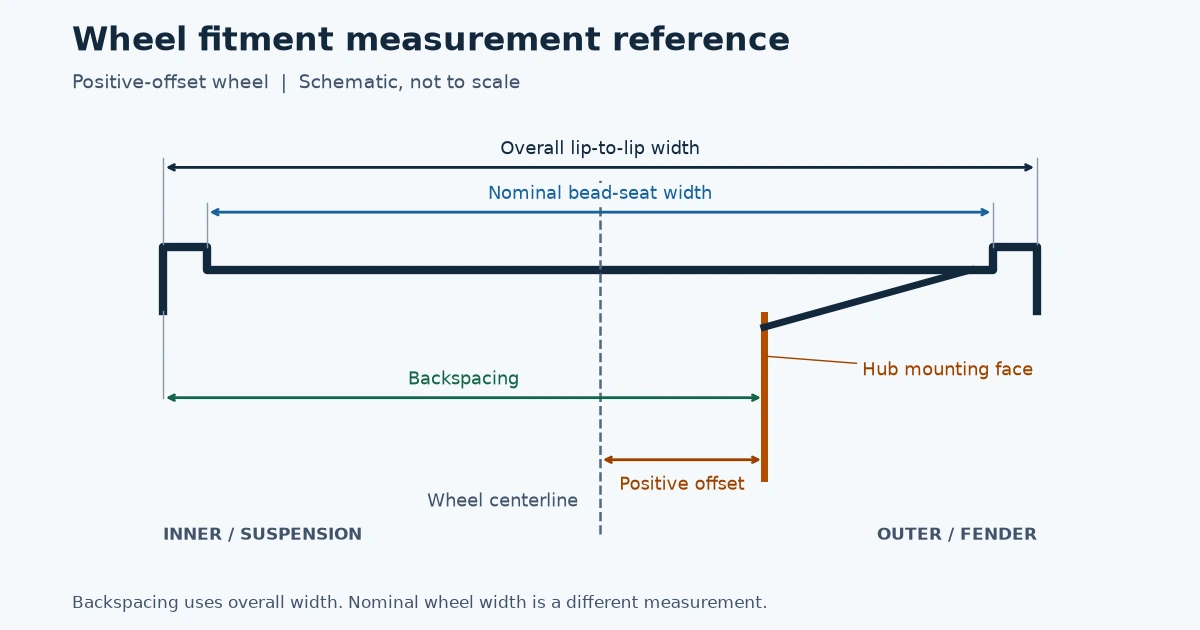
The hub mounting face is the flat surface where the wheel meets the vehicle. The wheel centerline sits halfway across its width. Offset measures the distance between that centerline and the mounting face. Backspacing runs from the mounting face to the inner rim edge; frontspacing runs to the outer rim edge.
These measurements describe different properties. A wheel can share the factory bolt pattern and still have the wrong bore, position or spoke shape. Keep a written spec for each candidate wheel so a missing measurement stays visible.
Check the bolt pattern first
The bolt pattern combines the number of mounting holes with the diameter of the circle through their centers. Match both values to the vehicle’s approved spec. Similar patterns can look correct by eye while placing the fasteners off center. Read the approved specs first. Use a tape measure to cross-check them.
For example, 5×114.3 means five mounting holes on a 114.3 mm pitch circle. It does not mean a neighboring metric pattern or a rounded inch conversion is interchangeable.
Four-, six- and eight-lug patterns have opposite hole centers you can measure across. Five-lug patterns do not. Casual edge-to-center shortcuts can misidentify them; use a proper pattern gauge or the wheel maker’s method. Multi-pattern wheels also require you to identify the correct hole set.
Compomotive’s technical reference explains PCD and the different measurement layouts. Do not force fasteners into a near match or use tightening torque to pull a misaligned wheel into place.
Match the center bore and hub interface
The center bore is the opening that passes over the vehicle’s hub. Check its diameter, depth and shape against the hub and wheel instructions. An approved centering ring may fit a larger bore to a smaller hub. A smaller wheel bore cannot seat over a larger hub as supplied.
A hub-centric system locates the wheel around the hub pilot. Some wheel systems use other approved centering arrangements. Follow the instructions for the exact design instead of assuming every aftermarket wheel needs the same ring.
Check that the mounting pad rests flat. A bore step, hub cap, old ring or debris can hold it away from the hub. Do not clamp the wheel down to overcome a gap.
Correct rings cannot fix a wrong bolt pattern, poor balance, damaged wheel or incompatible hardware. BBS’s installation manual shows why ring fit and retention depend on the wheel system.
Compare wheel diameter and width
Wheel diameter and width describe the tire’s mounting dimensions, but they do not give the whole outside shape of the rim. Check the tire maker’s approved rim-width range and the vehicle’s tire requirements. Allow for the wheel lips and actual tire width too. Check the brake package and the space around the wheel.
A wheel marked 18×8 has an 18-inch nominal diameter and an 8-inch nominal bead-seat width. Overall lip-to-lip width is larger than bead-seat width. Measure the actual overall width if you need an accurate backspacing figure; a fixed flange allowance is only an estimate.
A wider wheel changes both inner and outer position unless offset also changes. A wider tire can extend beyond the rim, and its published section width depends on the measuring rim. Check the exact tire data sheet.
Changing diameter also affects sidewall choices. Use a tire diameter, load and speed rating the vehicle maker approves. Check any rules for the drivetrain too.
Use offset and backspacing together
Offset places the mounting face relative to the wheel centerline, while backspacing measures depth to the inner rim edge. Compare both wheel width and offset when you check clearance. Lower offset moves an otherwise identical wheel outward; greater width can move its inner edge toward the suspension at the same time.
Positive offset puts the mounting face toward the outer face of the wheel. Zero offset puts it at the centerline. Negative offset puts it toward the inner side. ET is a common offset label, usually in millimeters.
With equal rim-edge dimensions and consistent units: backspacing = overall width / 2 + offset. Convert inches to millimeters with exactly 25.4 mm per inch. Use measured overall width for absolute backspacing.
Calculated example: 8-inch ET40 to 9-inch ET35
Assume no spacers and comparable rim-edge profiles. The nominal width increases by 25.4 mm, or 12.7 mm per side. Offset falls by 5 mm.
- The inner rim edge moves 7.7 mm toward the suspension: 12.7 minus 5.
- The outer rim edge moves 17.7 mm outward: 12.7 plus 5.
These are estimated rim-edge movements, not tire measurements or vehicle approval. Enter your own figures in the wheel fitment comparison tool. A spacer changes effective offset, but it also changes the hub and hardware requirements.
For spacer thickness, hub fit and hardware checks, read the wheel spacer guide.
Check brake, strut and suspension clearance
Brake and suspension clearance requires separate checks around the wheel barrel, behind the spokes and beside the tire. Wheel diameter, width and offset cannot describe every spoke curve or barrel step. Use the exact brake template, wheel drawing or physical test fit, then assess suspension movement with a qualified installer.
Brake and spoke clearance
Check radial room inside the barrel and lateral room behind the spokes. Include balance weights, valve hardware and any barrel drop center. Two wheels with the same size and offset can clear different brakes.
Print a brake template at the maker’s stated scale and verify its reference ruler. Essex explains checks for the exact wheel and brake kit. Follow that kit’s clearance requirement; do not apply one universal gap to all brakes.
Inner strut and control-arm clearance
Inspect the nearest strut body, spring perch and control arm. Check both the rim and tire. A gap beside the rim says nothing about the widest part of the sidewall farther up.
Suspension travel
Suspension travel changes the space around the wheel and tire. Clearance with the wheel hanging free may differ from clearance at ride height or compression. Ask an installer to check the relevant travel safely, especially with lowered suspension or changed alignment.
Check fender, liner and steering clearance
Fender clearance depends on the wheel position, tire shape and movement of the assembly. Check the outer arch, inner liner and nearby trim at ride height, through steering lock and during safe suspension checks. A wheel that looks flush while parked can still make contact when the vehicle turns or compresses.
Outer wheel and tire position
Measure to the closest fixed edge, including any inner fender lip. Account for the tire’s shoulder and sidewall bulge. Rim poke from a calculator does not predict the tire’s exact outer surface.
Full-lock steering
Check both steering directions. Watch the front and rear of the tire near liners, mud flaps, hoses and suspension parts. Check both sides of the vehicle; past repairs or alignment can leave different gaps.
Compression and bump travel
Passengers, cargo and bumps can reduce body clearance. A parked check cannot show all road loads or tire flex. Keep hands out of the wheel arch during movement and let an equipped workshop assess travel. Check local rules on wheel coverage and car changes before you buy wheels with added poke.
Confirm load rating and fastener compatibility
Wheel load rating, tire load capacity and correct fasteners are separate requirements. Get proof of the wheel’s load rating for your vehicle. Use an approved tire size and load rating too. Match the fastener seat, thread diameter, thread pitch and engagement to the wheel and vehicle instructions. Confirm any spacer hardware as part of the same assembly.
Do not approve a wheel from its appearance, diameter or vehicle curb weight alone. Ask the wheel supplier to confirm capacity against the vehicle’s rated axle loads and intended use. Tire load capacity also depends on the tire and its air pressure.
Conical, ball and flat seats need matching hardware. The wrong seat can give poor contact even when the threads fit. Bolts must provide the required engagement without bottoming out or touching parts behind the hub. Closed nuts must not bottom on the studs.
Forgeline’s installation instructions address seat and thread compatibility. Use the lug-nut torque directory as a lookup starting point, then confirm the exact requirements with the vehicle and wheel instructions. Check tire pressure before driving.
Pre-purchase measurement workflow
Start a pre-purchase wheel fitment check by recording the current assembly and the exact proposed spec. Measure accessible gaps, compare geometry and resolve missing brake, hub or hardware details before ordering. A worksheet helps you give the supplier useful measurements and keeps an estimate separate from a confirmed physical fit.
- Record the current wheel marking, tire size, front or rear position and any spacer thickness. Photograph the markings and note brake or suspension changes.
- Measure visible gaps at normal ride height. Record the nearest fender, liner, strut and spring-perch locations. Note whether each gap is beside the tire or rim.
- Have an installer measure hidden inner and outer clearances where access is unsafe. Keep the vehicle supported as its manual requires.
- Compare current and proposed width, offset and spacers in the calculator. Subtract any estimated lost clearance from the relevant measured gap. Allow for measurement error.
- Check the brake template and hub interface. Confirm bore, mounting-pad seating, bolt pattern and fasteners for each wheel position.
- Send the worksheet to the wheel supplier. Request confirmation of capacity, tire pairing, hardware and compatibility with your exact vehicle and modifications.
- Arrange a test fit before final installation if questions remain. Check the return policy before mounting tires, and follow the makers’ torque and recheck instructions.
Helpful tools for checking wheel fitment
A straightedge, depth rule and caliper help you record wheel measurements before buying. A fitment gauge helps you check wheel position at the hub. Choose tools with a suitable range, and check load ratings on lifting gear. Follow your vehicle manual for safe support and the correct wheel torque.
As an Amazon Associate, SelectMyBlog earns from qualifying purchases.
Digital caliper
Check small dimensions such as lip thickness or center bore within the caliper’s range.
Check digital calipers on AmazonWheel offset measuring tool
Browse fitment gauges that help you mock up rim position at the hub.
Check offset tools on AmazonBackspacing measuring tools
Use a straightedge and depth rule to measure from the inner rim lip to the mounting pad.
Check backspacing tools on AmazonAutomotive torque wrench
Choose a range that covers the lug torque specified in your vehicle manual.
Check torque wrenches on AmazonSpacer measurement kit
Compare spacer thickness and available clearance with gauges. Match any hardware to the vehicle separately.
Check spacer measuring tools on AmazonWheel chocks and jack stands
Check equipment ratings and follow the vehicle manual for lift and support points.
Check wheel safety gear on AmazonCommon wheel fitment mistakes
Common wheel fitment mistakes come from treating one matching measurement as complete approval. Diameter, bolt pattern, offset, bore and capacity each answer a different question. Compare the whole assembly against your vehicle, including its modifications. Get the full specs before you buy. Photos, a catalog filter and another owner’s setup leave gaps.
- Matching diameter only: check spoke shape, barrel profile and the brake template too.
- Confusing offset with backspacing: include wheel width and use the same units.
- Ignoring center bore: verify the full hub interface and any approved centering parts.
- Assuming spacers fix every problem: confirm their approval, mounting support and hardware requirements. They cannot correct wheel capacity or tire suitability.
- Skipping load rating: obtain documented capacity before buying, including used wheels.
- Treating a catalog listing as universal: confirm trim, brake package, axle position and modifications with the supplier.
What the calculator can and cannot tell you
A wheel fitment calculator estimates position changes from the dimensions you enter. It helps you compare rim edges, effective offset and backspacing under stated assumptions. Physical compatibility still needs separate evidence. The tool cannot inspect the spokes, hub or fasteners. It cannot check load rating or tire clearance through steering and suspension travel.
| Can estimate | Cannot certify |
|---|---|
| Inner and outer rim-edge movement | Spoke, barrel or brake-caliper clearance |
| Effective offset after spacer changes | Hub engagement or hardware suitability |
| Backspacing under the selected width method | Wheel capacity or tire load approval |
| Basic tire dimensions from supported size codes | Actual tire rubbing or legal compliance |
Keep the wheel fitment tool results with your measurements. Treat a lost-clearance estimate as a reason to investigate. A positive remaining gap does not prove safe clearance under load.
Vehicle-specific fitment pages
A vehicle-specific fitment page should name the make, model, year and trim. It should state the brake package and front or rear axle for each spec. Start with the vehicle manual or OEM parts data, then confirm the proposed wheel with its maker. A model name alone can miss brake options, market variants or changes to the car.
If you use a wheel fitment calculator by car, check which source supports its factory baseline. This guide provides no model-specific fitment certification. Keep three records: stock wheel sizes, your sums and the supplier’s fit approval. Ask for the exact wheel part number on any written confirmation.
Frequently asked questions
Wheel fitment questions often start with a size or offset, but a purchase decision needs the mounting, clearance and capacity checks together. Use these answers to identify the next detail to verify. Confirm exact vehicle and wheel specs with the makers before you approve a setup or mount tires.
How do I know if a wheel will fit my car?
Match the bolt pattern, hub and approved wheel sizes. Check tires, load rating and fasteners. Confirm brake and body clearance through steering and suspension travel. Read the vehicle and wheel specs, then arrange a test fit if you still have doubts.
What five measurements do I need for wheel fitment?
Start with bolt pattern, center bore, wheel diameter, wheel width and offset. Those five specs help screen a candidate wheel. Complete the check with tire dimensions, brake shape, moving clearance, wheel load rating and fastener compatibility before you make a purchase.
Does bolt pattern have to match exactly?
Yes. Match both the lug count and pitch-circle diameter to the approved vehicle application. Similar patterns can place fasteners off center. Do not force a near match or assume tightening will correct it. Treat adapters as a separate engineered system requiring approval.
What is the difference between center bore and bolt pattern?
Center bore describes the wheel’s central opening and its interface with the hub. Bolt pattern describes the number and circle diameter of its mounting holes. Both need compatible specs. A correct centering ring cannot correct the wrong bolt pattern or unsuitable hardware.
Can a wheel fit if the offset is different?
A different offset may work if the complete assembly meets the vehicle and wheel requirements. Compare width and offset together, then check brake, suspension and body clearance. Confirm hub engagement, hardware and capacity too. No single offset difference guarantees approval for every vehicle.
Can a wheel fitment calculator guarantee fitment?
No. A calculator uses your inputs to estimate wheel position. It cannot inspect spoke shape, hub seating, hardware, load rating or tire movement. Use the results to plan checks. Get the maker’s approval and test fit if needed before you mount wheels.
Keep this wheel fitment guide with your worksheet. Record the specs, compare wheel positions and check the fit before you buy.