
Wheel Spacer Guide: Choose The Right Size And Check Fitment
A wheel spacer moves the wheel outward by its thickness and lowers effective offset by the same amount. This wheel spacer guide covers thickness, hub fit, hardware and installation checks. Choose a spacer for the exact wheel and vehicle combination, then confirm clearance and the maker’s instructions before use.
A spacer can change where the wheel sits, but the complete setup still needs the right load rating, bolt pattern and tire size. Start with measured gaps and a clear fitment goal. Use the wheel offset calculator for the position comparison; use product drawings and an installer to check the physical fit.
Use the wheel fitment guide for the full bolt-pattern, bore, brake and tire-clearance checklist.
Wheel spacer sizes and effective offset at a glance
Subtract spacer thickness from the wheel’s stamped offset to find effective offset. Both values must use millimeters. An ET35 wheel with a 5 mm spacer has an effective offset of ET30. The wheel’s stamp stays unchanged. These geometry examples describe position changes and do not recommend a spacer size for your vehicle.
| Spacer per wheel | Effective offset | Outward movement |
|---|---|---|
| 5 mm | ET30 | 5 mm |
| 10 mm | ET25 | 10 mm |
| 15 mm | ET20 | 15 mm |
The formula is effective offset = stamped offset - spacer thickness. It assumes the spacer seats fully and the wheel stays the same. If your current wheels already use spacers, include them in the baseline. Compare the change between the old and new assemblies.
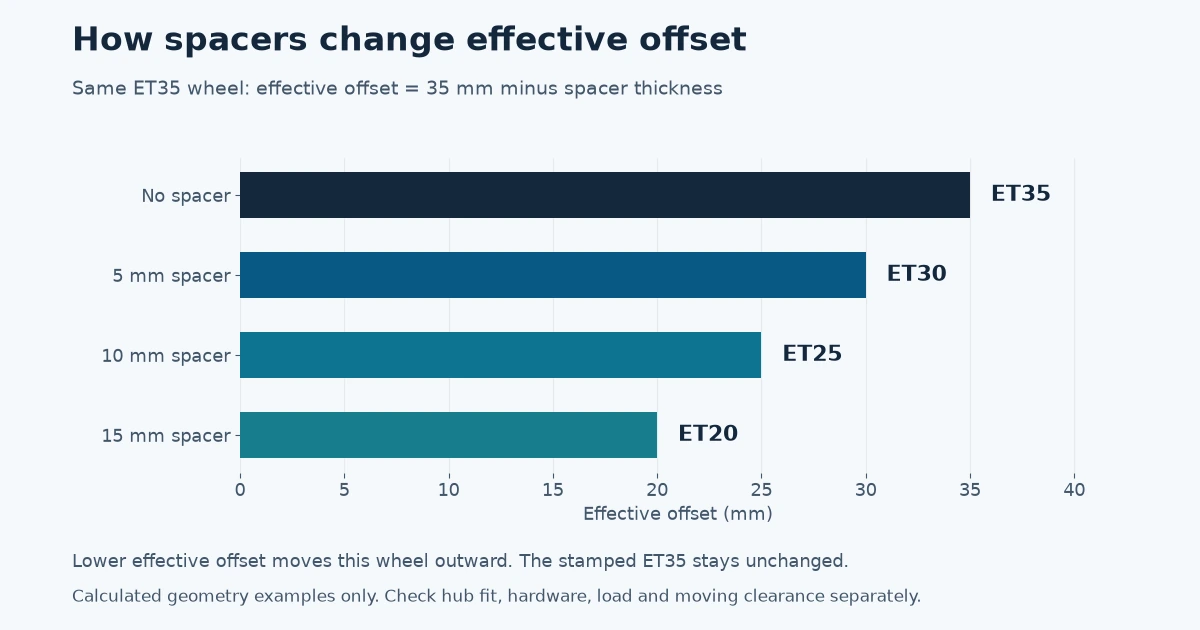
What a wheel spacer changes
A wheel spacer adds distance between the hub mounting face and the wheel. With the same wheel and tire, it shifts the assembly outward and reduces effective offset. This usually adds space beside the inner tire or rim at a fixed reference point. It uses some of the outer gap.
For example, equal 10 mm spacers on both sides of one axle increase its track width by 20 mm. That is a geometric change, not a claim of better grip or handling. Do not confuse a kit’s stated total track increase with thickness per wheel.
A lower effective offset shifts the tire relative to the steering axis and bearings. Steering feel and component loads may change. Ask the vehicle and spacer makers to confirm the proposed setup. Geometry alone cannot predict bearing life.
Wheel width stays unchanged. If you buy wider wheels at the same time, calculate the width and offset changes together. A spacer-only estimate cannot describe that combined change.
Tools for measuring and checking spacer fit
A straightedge, caliper and depth gauge help you measure gaps and hub details. Choose tools that cover the size you need to check. Use a torque wrench with the right range for your fasteners. These links open tool searches; confirm each item meets your own measurement or lifting needs.
As an Amazon Associate, SelectMyBlog earns from qualifying purchases.
Digital caliper
Check small dimensions such as lip thickness or center bore within the caliper’s range.
Check digital calipers on AmazonWheel offset measuring tool
Browse fitment gauges that help you mock up rim position at the hub.
Check offset tools on AmazonBackspacing measuring tools
Use a straightedge and depth rule to measure from the inner rim lip to the mounting pad.
Check backspacing tools on AmazonAutomotive torque wrench
Choose a wrench range that covers the specified torque for both the spacer-to-hub fasteners, where fitted, and the wheel fasteners. Check the vehicle, wheel and spacer instructions.
Check torque wrenches on AmazonSpacer measurement kit
Compare spacer thickness and available clearance with gauges. Match any hardware to the vehicle separately.
Check spacer measuring tools on AmazonWheel chocks and jack stands
Check equipment ratings and follow the vehicle manual for lift and support points.
Check wheel safety gear on AmazonHub-centric versus lug-centric spacers
Hub-centric spacers use a close-fitting hub interface to locate the assembly around its center. Check the vehicle-side bore and the wheel-side centering lip, including their depth and shape. Lug-centric designs rely on the approved fastener arrangement for centering. Either description leaves other fit and load checks that you must complete.
A thin slip-on spacer may leave enough of the original hub pilot exposed to locate the wheel. Another design may need its own raised lip. Thickness alone does not tell you whether enough usable pilot remains: the wheel bore can have a chamfer that reduces contact.
The ECS spacer reference illustrates these centering interfaces. Check the exact spacer drawing against the hub and wheel. A raised lip can still be too tall, too short or the wrong diameter for the parts you have.
Seat each part by hand and check for gaps or rocking. A hub-centric label does not prove wheel spacer safety. A centering ring also cannot restore missing thread engagement or correct a smaller wheel bore that will not pass over the hub.
Poor centering can cause vibration, as the ECS hub-pilot diagrams explain. A correctly fitted ring cannot rule out other causes, such as tire imbalance or a bent wheel. Stop and have the assembly checked if vibration starts after installation.
Slip-on, bolt-on and bolt-pattern adapters
Slip-on spacers sit between the hub and wheel, with the wheel fasteners clamping the assembly together. Bolt-on spacers attach to the hub first and provide a separate wheel attachment. A bolt-pattern adapter changes the mounting pattern between those interfaces. Identify the design first. Then choose the hardware and follow its fitting steps.
| Design | Hardware check |
|---|---|
| Slip-on spacer | Confirm remaining thread engagement; longer studs or bolts may be required. |
| Bolt-on spacer | Confirm both attachment systems and clearance behind the wheel. |
| Bolt-pattern adapter | Verify the hub-side and wheel-side PCD, centering and all fasteners. |
Names vary between sellers. A bolt-on unit can keep the original pattern, so the word adapter alone does not establish a PCD change. Read the specifications for both faces.
On a stud-mounted bolt-on design, original studs can extend beyond the spacer. They must clear any approved pockets behind the wheel. H&R’s TRAK+ installation guidance separates its systems and their hardware checks. Do not grind studs or spacer hardware to force a fit; have the maker confirm an approved solution.
How to choose spacer thickness
Choose spacer thickness from measured clearance, the intended position change and the approved hub and hardware combination. Start with the smallest change that meets the stated goal within the makers’ limits. A fender gap alone cannot prove a spacer size is safe. Steering, suspension travel and tire shape also affect clearance.
- Record the current wheel width, offset, tire size and any existing spacer on each axle.
- Measure the closest inner and outer gaps at normal ride height. Note whether each measurement refers to the rim or tire.
- Compare the proposed assembly in the wheel offset calculator. Include changed wheel width and offset as well as spacer thickness.
- Check the remaining hub pilot, spacer lip and fastener requirements for that thickness.
- Ask the supplier to confirm the exact part number against your vehicle, wheel and brake package.
Suppose your chosen tire-to-fender reference has a 12 mm static gap. A 10 mm outward shift leaves a calculated 2 mm at that same reference. That small remainder cannot establish room for tire flex or bump travel. Do not treat the full measured gap as usable spacer thickness.
Thread engagement and hardware compatibility
Thread engagement is the length of usable thread that actually connects the fastener to its mating part. A slip-on spacer uses some of the original reach, so the setup may need longer bolts or studs. Match thread diameter, pitch, seat shape and required engagement to the exact wheel, spacer and vehicle instructions.
With the same wheel and bolt seat, a thicker slip-on spacer reduces bolt reach by its thickness. VAC’s instructions for its spacer system call for longer bolts and a thread-engagement check. Confirm the required total length for your own system before ordering.
Do not apply one turn count to every thread. Pitch changes the axial travel per turn, and makers may specify different minimums. For example, H&R application note 40 requires a fully threaded shank and at least 7.5 turns of engagement for that application. This is an example, not a universal minimum. Use the instructions for your exact assembly.
A closed-end nut can bottom against a stud tip before it clamps the wheel. A long bolt can reach parts behind the hub. Check both conditions, and confirm that the socket reaches the fastener cleanly. Never reuse damaged or cross-threaded hardware. McGard illustrates this closed-end nut check.
If new press-in studs are needed, have a qualified installer check the knurl diameter and length, thread size and shank length. Eibach System 6 instructions show why these dimensions must suit the hub. Do not choose replacement studs by overall length alone.
Wheel spacer safety checks before installation
Wheel spacer safety depends on a compatible assembly, sound parts and correct clamping. Check both mating faces and the hub size. Check wheel capacity and each fastener before fitting the parts. Stop if the spacer rocks, a surface remains separated or the hardware will not turn freely by hand. Resolve the cause before applying torque.
- Match the vehicle-side bore and PCD to the exact hub.
- Confirm the wheel-side lip, chamfer and bore depth.
- Check flatness, cracks, corrosion and damaged threads.
- Verify the intended axle load, wheel capacity and the spacer maker’s approved application.
- Use the specified seats, bolts, studs and nuts at both interfaces.
- Never stack spacers, use damaged hardware or assume a universal spacer fits every hub.
Wheel Pros warns against stacking spacers and identifies adapter approval conditions. Check warranty and local modification rules before ordering. A material name or machining claim cannot prove the fit. Get the approved application, part number and load details.
How to install and recheck a wheel spacer
Install a wheel spacer only after you confirm its fit and obtain the instructions for that exact system. Use a qualified installer if the work needs new studs or involves uncertain hub clearance. Use this workflow to plan the checks. Follow the vehicle, wheel and spacer instructions for the actual work.
- Confirm the parts and tools. Read the supplied instructions, identify both torque values on a bolt-on system and record the required recheck interval.
- Support the vehicle as its manual directs and remove the wheel. Clean rust and debris from the hub, pilot, spacer and wheel mating surfaces without changing their shape.
- Seat the spacer fully by hand. Check both faces for flush contact, adequate pilot fit and interference with retaining hardware. Do not use fastener force to close a gap.
- Install the correct attachment hardware. A bolt-on spacer needs its own hub fasteners secured before the wheel goes on. Check any projecting studs or bolt heads against the wheel design.
- Mount the wheel and start fasteners by hand. Check free rotation where the instructions permit. Tighten in stages in the specified cross or star sequence, with final torque from a suitable torque wrench.
- Check steering and suspension clearance safely before driving. Follow the maker’s test procedure; begin with a cautious low-speed check only after the assembly passes inspection. Stop for rubbing, vibration or unusual noise.
- Recheck at the interval and by the method the maker specifies. A bolt-on setup may require access to the inner fasteners. Keep the parts list, torque instructions and recheck record together.
Find the wheel spacer torque spec in the product instructions, then reconcile it with the wheel and vehicle requirements. The lug-nut torque directory is a vehicle lookup starting point, not approval for every spacer interface. Ask the maker to resolve conflicting instructions.
Follow the specified dry or lubricated condition for threads and mating surfaces. Do not add oil, anti-seize or threadlocker unless the relevant instructions call for it. Lubrication changes the relationship between applied torque and clamping force.
What spacers cannot fix
A plain wheel spacer moves the wheel outward. It cannot make every wheel fit. Wrong bolt patterns, unsuitable center bores, low load ratings and incorrect fastener seats still need the right parts. Some spoke-clearance problems may respond to an approved outward shift, but a wheel’s barrel shape needs its own brake-clearance check.
| Problem | Required check |
|---|---|
| Wrong PCD or undersized bore | Use compatible parts; a pattern adapter is a separate system. |
| Inadequate wheel capacity | Choose a wheel rated for the application. |
| Wrong lug seat or too little thread | Use hardware approved for the assembly. |
| Brake-barrel interference | Check the actual wheel and brake profiles. |
| A tire outside its approved rim range | Choose an approved tire and wheel pairing. |
Do not use a centering ring to hide a loose mounting face or a thicker spacer to bypass an unknown hardware problem. Identify the mismatch first.
Spacers, rubbing and alignment
Spacers can increase inner clearance while reducing the gap at the fender or liner. Whether rubbing improves depends on the contact point, tire and suspension movement. Check full steering lock and safe compression travel. Alignment changes wheel angles such as toe and camber; it does not change the wheel’s stamped offset.
A tire that touches a strut may gain room after an approved outward move. The same move may bring its outer shoulder into the fender lip. At steering lock, the front or rear edge of the tire can also reach a liner.
Test both sides and axle positions with the actual tire fitted. Do not use an alignment adjustment to conceal a setup outside the approved fitment limits. If the required spacer leaves too little outer space, ask about a suitable wheel offset or tire pairing instead.
Spacer buying checklist
Buy from a clear spec sheet. It should list the hub fit, wheel fit, thickness and hardware. Check the exact vehicle and wheel approval before you buy. Keep the instructions and written fitment response with the part number. A vehicle filter or product photo cannot answer every mounting question.
| Record | Verify before ordering |
|---|---|
| Hub and wheel PCD | Exact pattern on each side. |
| Bore and hub lip | Diameter, pilot depth and chamfer clearance. |
| Thickness | Per-wheel value and resulting effective offset. |
| Application and material | Documented load suitability and traceable part number. |
| Hardware | Seat, pitch, length, engagement and wheel-pocket clearance. |
| Documentation | Torque, lubrication condition and recheck instructions. |
| Returns and approval | Test-fit policy, warranty and local compliance. |
Frequently asked questions
Wheel spacer questions need answers for the exact wheel, hub and fastener system. Use the examples here to understand the geometry and decide what to measure next. Keep safety approval with the relevant makers and installer. A matching size or hub-centric label alone cannot confirm that the complete assembly will work.
Do wheel spacers change offset?
Spacers reduce effective offset by their thickness in millimeters. The stamped offset on the wheel stays the same. With the same wheel, a spacer moves both rim edges outward. Check tire, brake, hub and hardware fit separately before treating that position change as acceptable.
What does a 5 mm spacer do to ET35?
A 5 mm spacer makes an ET35 wheel behave like ET30 in a position calculation. The wheel moves 5 mm outward if it seats fully. This example describes geometry only. It does not approve the spacer’s centering, thread engagement, capacity or vehicle clearance.
Are hub-centric wheel spacers safer?
Hub-centric spacers can provide the centering interface a hub-centric wheel requires, but the label alone does not establish safety. Check bore diameter, pilot depth, flush seating, hardware and approved application. Follow the exact system instructions and reject loose, damaged or mismatched parts.
What is the difference between slip-on and bolt-on spacers?
A slip-on spacer shares the wheel’s clamping fasteners and may need longer bolts or studs. A bolt-on spacer attaches to the hub first, then accepts the wheel through another attachment. Check both interfaces, including protruding hardware and wheel clearance, against the product instructions.
How much thread engagement is needed with spacers?
Use the minimum engagement specified for your exact thread, fastener and spacer system. There is no single turn count for every application. Confirm usable thread length, seat shape and bottoming clearance with the maker. Fit longer approved hardware when the existing reach is insufficient.
Can wheel spacers stop tire rubbing?
A spacer may reduce rubbing at an inner contact point by moving the tire outward. It can also cause contact with the fender or liner. Locate the original contact, measure both sides and check steering and suspension travel before approving any thickness change.
Use this wheel spacer guide to record the fitment goal, compare the offset change and resolve each mounting detail before buying. Keep the instructions with your installation record.