DIY Board and Batten Wall: Easy Board and Batten Spacing Calculator & Cut List
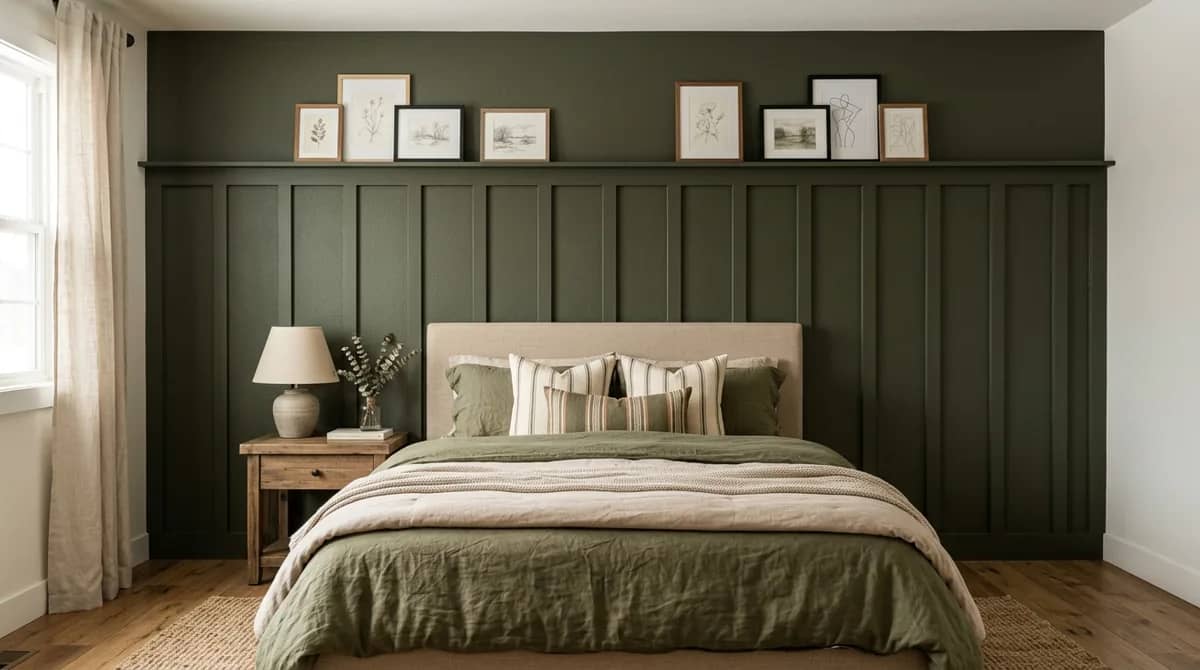
Board and batten spacing requires 12 to 18 inches of open space between boards, with 14 to 16 inches serving as the standard gap. To calculate your spacing, subtract the total width of all vertical boards from your total wall width. Then divide that remaining number by the number of open spaces.
Reader Disclosure: This guide contains affiliate links. Buying through our links may earn us a small commission at no extra cost to you. We recommend carpentry tools, trim lumber, and wall fasteners based on workshop tests, safety ratings, and residential durability.
Uneven spacing ruins an accent wall faster than crooked cuts. Measuring board to board with a flexible tape measure causes tiny errors that grow across the room. One small mistake leaves an awkward two-inch gap in your final corner. Using a simple math formula and a wooden spacer block gives you equal panels across the entire wall on your first attempt.
Quick Reference Matrix: Board and Batten Materials, Dimensions, and Spacing
Review standard board and batten styles against lumber dimensions, gap spacing, and top rails before buying materials. Classic two-thirds walls use 14 to 16-inch gaps with 1×3 boards. Full-height grids use 16 to 20-inch square boxes. Pick the layout that matches your ceiling height and room style.
| Accent Wall Style | Batten Spacing (Open Gap) | Recommended Board Size | Top Rail & Cap Detail | Primary Beginner Tool |
|---|---|---|---|---|
| Classic Two-Thirds (2/3) Height | 14 to 16 inches apart | 1×3 Primed MDF (2.5″ actual) | 1×4 rail with 1×2 picture ledge cap | Cordless 18-Gauge Brad Nailer |
| Modern Farmhouse Wainscoting | 12 to 14 inches apart | 1×4 Primed Pine (3.5″ actual) | 1×5 rail with 1×3 display shelf | Magnetic Stud Finder & Level |
| Full Floor-to-Ceiling Grid | 16 to 20-inch square boxes | 1×2 or 1×3 Primed Boards | 1×4 top header against ceiling crown | Compact Miter Saw |
| Narrow Hallway / Entryway | 10 to 12 inches apart | 1×3 Primed MDF with coat hooks | 1×6 structural rail with shaker pegs | Heavy Duty Construction Adhesive |
| Contemporary Vertical Slat | 8 to 10 inches apart | 1×2 Slim Battens (1.5″ actual) | Minimalist flat top cap | Paintable Acrylic Latex Caulk |
Calculate Your Spacing and Cut List Online
Wall lengths rarely divide into clean whole numbers, so skip manual math on scrap drywall. Use our free interactive tool to find exact cut lengths, board counts, and nail marks in seconds. Enter your wall width, board size, and desired spacing to generate your custom cut list.
How to Use the Board and Batten Spacing Calculator Formula: Step-by-Step
Clean trim carpentry requires exact panel spacing across the entire room. Every interior gap between boards must match within one-sixteenth of an inch. Learn the master formula to divide your wall into equal spaces without buying expensive layout tools or hiring a contractor.
Use the master layout formula:
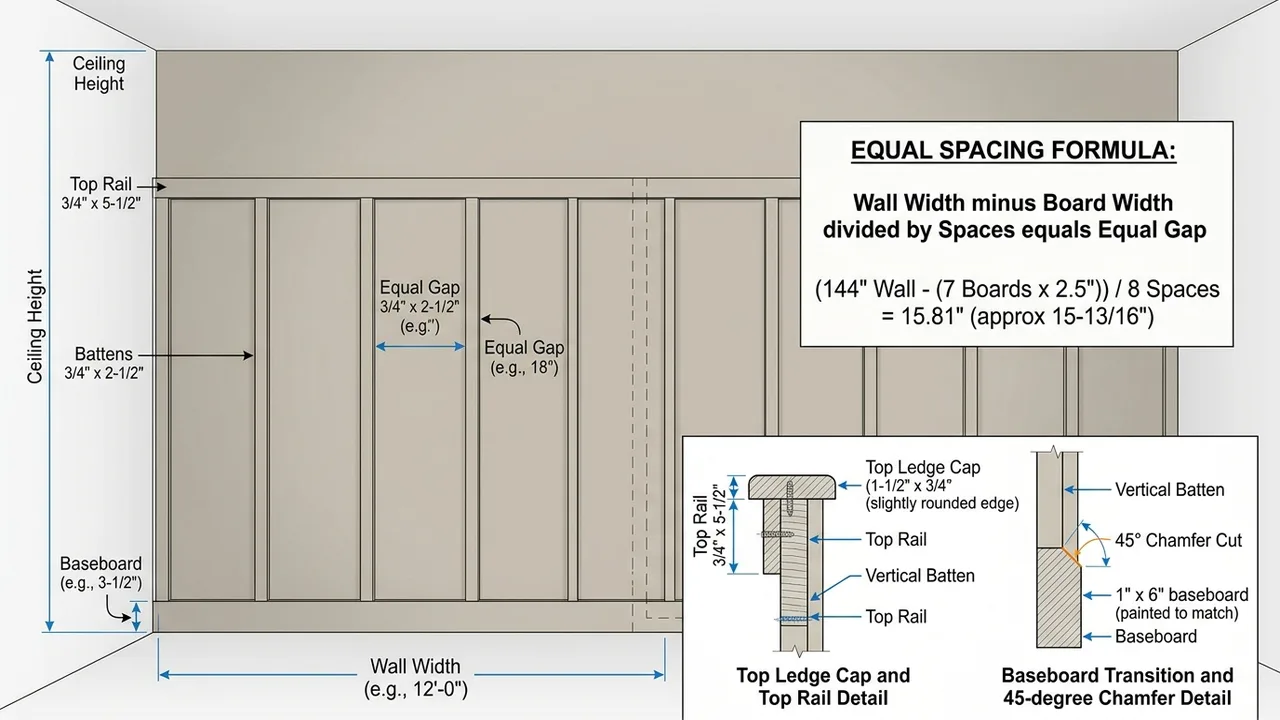
Spacing Gap = (Total Wall Width – [Number of Battens x Actual Batten Width]) / Number of Spaces
Always use actual board sizes, not nominal store labels. A 1×3 board actually measures 2.5 inches wide. A 1×4 board measures 3.5 inches wide, and a 1×2 board measures 1.5 inches wide. Using nominal numbers causes big spacing mistakes.
Follow these five math steps for a standard 144-inch (12-foot) bedroom accent wall:
- Measure your wall width along the baseboard from corner to corner. In this example, your wall measures 144 inches wide.
- Select your board width, such as 1×3 primed MDF boards measuring 2.5 inches in actual width.
- Pick your board count. Aim for a 15-inch gap. Add board width (2.5 inches) to the gap (15 inches) to get 17.5 inches per unit. Divide wall width by this unit: 144 / 17.5 = 8.22. Round to 9 total boards (two corner boards plus seven center boards).
- Calculate total wood width. Multiply 9 boards by the 2.5-inch actual width: 9 x 2.5 = 22.5 inches of wood.
- Subtract wood width and divide by spaces. Subtract 22.5 from 144 to find open wall space: 144 – 22.5 = 121.5 inches. Nine boards create 8 open spaces. Divide 121.5 inches by 8 spaces: 121.5 / 8 = 15.187 inches (roughly 15 and 3/16 inches per gap).
The Wooden Spacer Block Technique (The Zero-Error Hack)
Never measure every gap with a tape measure during installation, because flexible tape measures bend and cause alignment drift across long walls. Cut a scrap wood block to your exact gap size (15 and 3/16 inches) on your miter saw.
Place the spacer block flush against your first corner board, and slide your next board against it. Check plumb with a torpedo level before driving your brad nails into the wall. Move the block to each station across the room. This simple spacer block guarantees equal gaps without measuring mistakes.
Wall Height Architecture: The Two-Thirds (2/3) Rule vs. Full Grid
Your board and batten height sets the mood of the entire room. Clashing heights make rooms feel short and boxy. Follow the two-thirds rule on standard walls, or run a full grid up to the ceiling crown molding. This proportion balances furniture lines and draws eyes upward.
Pick the best wall height based on your ceiling height and room goals:
- Classic two-thirds height suits standard 8-foot ceilings. Mount your top rail 64 to 72 inches from the floor. This height frames headboards and leaves room for wall art above.
- Three-quarters height fits 9 to 10-foot ceilings. Mount your top rail at 78 to 84 inches to highlight high ceilings.
- Full floor-to-ceiling grids run from baseboard to ceiling trim. This dramatic style works in dining rooms and primary bedrooms.
Never install your top rail at exactly 48 inches on an 8-foot wall. Cutting a room in exact halves visually chops the wall in two. It makes ceilings feel low and cramped.
Baseboards and Trim Transitions: Sizing Without Tearing Out Baseboards
Install board and batten without tearing off existing baseboards by cutting bottom bevels or adding a flat top cap. Standard baseboards measure 3/8-inch thick, while 1×3 trim boards measure 11/16-inch thick. Angling the bottom of each vertical board creates a clean transition with zero overhang.
Use one of these three carpentry methods to handle baseboard transitions:
- Cut a 45-degree chamfer bevel on the bottom front edge of each vertical board. Stop 1/4 inch above the baseboard. This angled cut tapers the thick board down to meet thin baseboards cleanly.
- Add a flat 1×2 cap strip along the top edge of your existing baseboard. Your vertical boards sit flat on top of this new ledge without overhanging.
- Pry off old baseboards with a trim puller. Install a flat 1×6 baseboard, and rest vertical boards on top for a historic craftsman look.
The Complete DIY Materials and Cut List for Beginners
Gather all lumber and tools before making your first cut to prevent extra trips to the hardware store. Buy primed MDF for ultra-smooth surfaces, or choose primed pine for bathrooms. Use 2-inch brad nails and flexible molding caulk to lock all trim boards flat against drywall.
For a standard 12-foot accent wall, pick up these project materials:
- Buy 9 primed 1×3 MDF boards (11/16″ x 2.5″ x 8′) for vertical battens. Use moisture-resistant primed pine in humid bathrooms.
- Buy two 8-foot primed 1×4 boards (11/16″ x 3.5″) for the horizontal top rail.
- Buy two 8-foot primed 1×2 boards (11/16″ x 1.5″) for the top picture ledge cap.
- Stock 2-inch 18-gauge brad nails to pin trim boards through drywall into wall studs.
- Pick up two tubes of DAP Alex Flex molding caulk and one tube of heavy duty construction adhesive.
- Keep a tub of shrink free sandable wood filler and 220-grit sanding sponges ready.
Construction Adhesive vs. Criss-Cross Brad Nailing
Construction adhesive glues boards permanently to drywall. It stops board warping, but pulling glued boards off damages drywall paper. If you rent or want to remove trim later, avoid construction glue.
Find wall studs with a magnetic stud finder with level, and drive nails directly into wood studs. Over hollow drywall, use a cordless 18-gauge brad nailer kit to drive nails in criss-cross angled pairs. Drive one nail 30 degrees upward, and drive the next 30 degrees downward to lock boards flat without glue.
Navigating Electrical Outlets and Light Switches
Work around electrical outlets without crooked cuts or awkward faceplates. Shift your board spacing slightly in our online calculator to clear wall boxes completely. When boards must cross an outlet, use box extension rings to bring the receptacle flush with the new trim face.
Use one of these three strategies when an outlet blocks your trim:
- Test 8 boards versus 9 boards in our calculator. Changing your board count moves vertical battens a couple inches across the wall, and this math shift often clears wall outlets completely.
- Center the board over the outlet and cut separate top and bottom pieces. Add an electrical outlet box extender kit to bring the outlet flush with the new wood face. Mount your plate on the board.
- If a board clips only a half-inch of an outlet box, notch the back of the trim board with an oscillating multi-tool. The wood slides around the box, leaving the front face clean.
Seam Finishing and Color Drenching: Caulk, Fill, and 2026 Trending Paint Palettes
Careful prep work turns simple trim boards into custom architectural millwork. Fill nail holes with sandable wood filler, caulk every seam where wood meets drywall, and seal raw MDF cuts before painting. These four steps guarantee smooth panels and invisible joints across the wall.
Complete these four finishing steps before rolling your final paint coats:
- Fill nail holes with wood filler. Mound filler slightly over each hole because it shrinks as it dries, then sand flush with 220-grit sandpaper once dry.
- Run a narrow bead of paintable acrylic caulk along every wood seam. Smooth the caulk with a wet finger and wipe away excess caulk with a rag. Uncaulked seams leave dark gaps that look sloppy.
- Prime raw MDF cuts with shellac or oil primer before painting to prevent rough fiber swelling.
- Roll wood and drywall using a 4-inch microfiber mini paint roller kit. Cut in edges with an angled sash brush, then roll flat faces for a smooth finish.
2026 Trending Accent Wall Color Palettes
Modern homes embrace color drenching on accent walls. Paint the boards, drywall, top ledge, and baseboards in the same exact color. Using one unified color makes rooms feel larger and adds rich texture.
Try these trending paint colors for your board and batten wall:
- Earthy Olive Greens: Sherwin-Williams Pewter Green (SW 6208) and Benjamin Moore October Mist (1495) add warmth next to light oak furniture.
- Moody Deep Navies: Benjamin Moore Hale Navy (HC-154) and Sherwin-Williams Naval (SW 6244) create bold contrast behind beds and dining tables.
- Warm Greiges: Sherwin-Williams Accessible Beige (SW 7036) and Benjamin Moore Pashmina (AF-100) soften stark rooms without feeling sterile.
Frequently Asked Questions
Find direct answers to common questions about planning and building board and batten walls. Learn about textured drywall, adhesive alternatives, paint sheens, and small room tricks so you can complete your carpentry project with confidence.
Do you need to install hardboard panels behind the battens on textured walls?
Nail boards directly to drywall if your walls have smooth or light orange-peel texture. On heavy knockdown or popcorn walls, install 1/8-inch hardboard sheets over drywall first to create a flat, smooth wainscoting surface.
Can you install board and batten without using construction adhesive?
You can install trim without glue by nailing into wall studs or driving nails at opposing 30-degree angles. This criss-cross angle locks boards flat against drywall without tearing drywall paper if removed.
Does board and batten make a small room look bigger?
Vertical boards draw eyes up toward the ceiling to create an optical illusion of taller ceiling height. In small powder rooms, entryways, and narrow hallways, board and batten makes rooms feel taller and custom-built.
What is the difference between board and batten and traditional wainscoting?
Wainscoting is an umbrella term for decorative wood wall paneling on lower walls, while board and batten is a specific historic style. It uses flat vertical boards over wide flat panels with clean geometric spacing.
What paint sheen works best for board and batten walls?
Satin and eggshell paint sheens work best on board and batten walls because satin highlights shadow lines while resisting scuffs in busy rooms. Skip high-gloss paints, which show minor drywall flaws.
Coordinate Your Wall Carpentry with Whole-Home Clearances
Continue refining your interior trim, wall decor, and lighting projects with our practical design guides:
- The 57-Inch Rule: Exactly How High to Hang Art Over a Sofa, Headboard & Blank Walls
- Symmetrical Grid Gallery Wall: How to Hang 6 or 9 Matching Frames Without Extra Holes
- How to Choose the Right Mat Size for Frames: The Golden Border Ratio
- Peel-and-Stick Accent Wall: Exactly How Many Rolls to Buy (Avoid Pattern Match Waste)
- What Wood Tones and Paint Colors Go with Honey Oak Trim?