How to Identify Authentic Reclaimed Wood: 5 Proof Tests

Reader Disclosure: This post contains affiliate links. If you buy through them, we may earn a commission at no extra cost to you. We only recommend items tested for clean craftsmanship and authentic durability.
Authentic reclaimed wood is old lumber taken from historic barns and factories built before 1940. You can identify real reclaimed timber by checking five proof signs. Look for antique saw marks, dark iron stains around square nail holes, tight growth rings, deep natural cracks, and heavy heartwood weight. Many lumber yards sell new pine beat up with chains and wire brushes to fake an aged look.
Buyers lose thousands of dollars on fake distressed wood each year. Retail stores sell fresh pine hit with hammers as authentic barn lumber. This modern wood lacks the strength, resin density, and rich look of real antique beams. Learning to identify real reclaimed wood protects your home design budget and stops warped boards from ruining your walls.
Before buying salvage timber, check our interactive reclaimed wood calculator. It calculates exact board feet, timber weight loads, and wall stud spacing for your wall accent project.
What Is Authentic Reclaimed Wood and Why Does It Look Different?
Authentic reclaimed wood comes from old-growth trees cut down more than one hundred years ago. These wild trees grew slowly in dense forests for centuries. Slow natural growth created thin annual rings, dense heartwood, and heavy sap pitch. Modern lumber comes from tree farms where trees grow fast in open sunlight. This fast growth leaves modern wood soft, pale, and weak.
Carpenters prefer real antique lumber for its stability. Because old timbers sat inside dry barns for decades, they do not twist or bow in heated rooms. Real antique wood also carries a deep amber surface color. Decades of sunlight, wood smoke, and seasonal air create a warm patina that modern paint stains cannot match.
Proof Test 1: Examine Historic Saw Marks and Blade Geometry
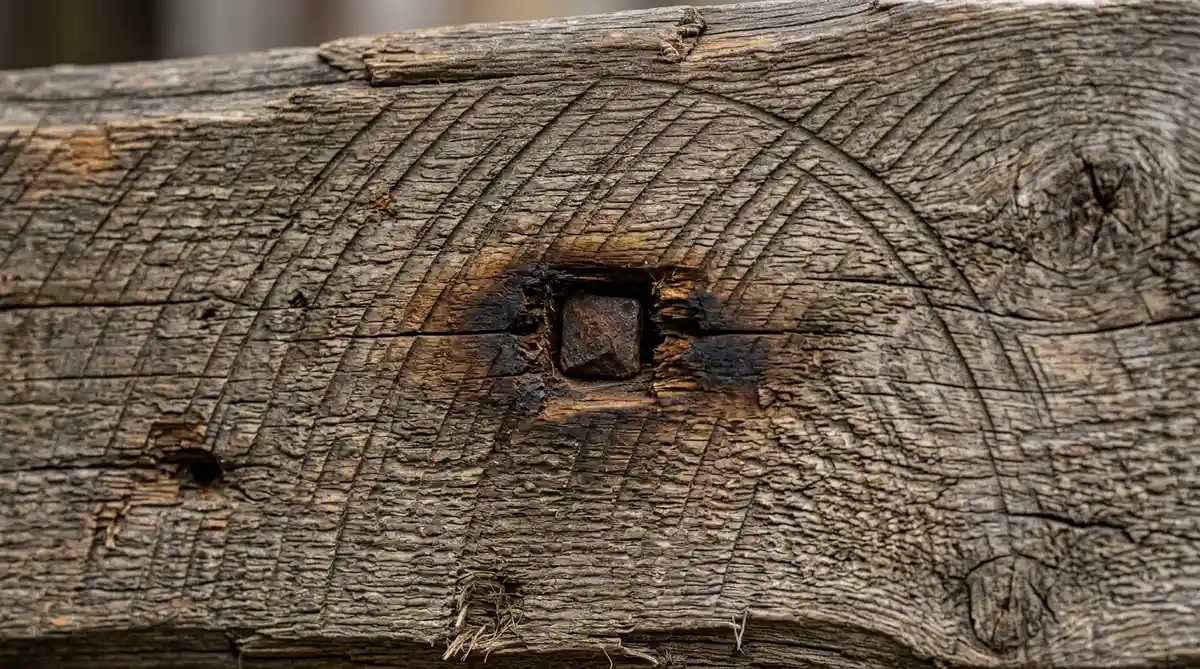
Historic saw marks show clear proof of old milling methods. Early sawmills used heavy vertical sash blades or large water-powered circular blades. Each cutting blade left distinct, uneven tool marks across the wood grain that modern machines cannot copy.
Identifying Circular Saw Radial Arcs
Look at the wood surface under good side light. Circular sawmills became common across the country during the nineteenth century. Large round steel saw blades left curved lines called kerf marks. These lines arc across the board face at slight angles. The gap between each cut line changes along the board because workers pushed logs by hand at uneven speeds.
Spotting Vertical Sash Saw and Hewn Axe Textures
Look at older beams from the early 1800s for straight cut marks. Early sash sawmills moved a straight saw blade up and down. This blade motion made straight parallel lines across the wood grain. On hand-hewn barn beams, look for axe marks. Early builders swung heavy broadaxes to square round tree logs by hand, leaving scallop marks along the corners.
Modern lumber mills feed fresh logs through rotary planer knives. This fast machine process leaves smooth, even ripples spaced fractions of an inch apart. Reject any board that shows flat planer lines under an artificial dark stain.
Proof Test 2: Inspect Square Nail Holes and Dark Iron Oxide Patina
Real reclaimed wood shows dark black stains around every old nail hole. When old iron nails sat in damp wood for decades, the iron metal reacted with wood acid. This natural reaction created a deep black stain that soaked deep into the wood cells.
Square Cut Nails Versus Modern Round Wire Nails
Check the shape of empty fastener holes on the board face. Before the 1890s, blacksmiths cut iron nails into square shapes with blunt ends. When builders pulled these nails from old barns, the wood kept clean four-sided holes. Modern wire nails invented after 1900 leave round holes with smooth walls.
Fake reclaimed wood often has round holes made with modern drill bits. Fake lumber shops then dab dark paint inside the holes to look old. You can spot this trick quickly. Real iron rust stains spread along the wood grain for several inches, while fake paint stain stops right at the hole edge.
Proof Test 3: Count End-Grain Growth Rings and Heartwood Density
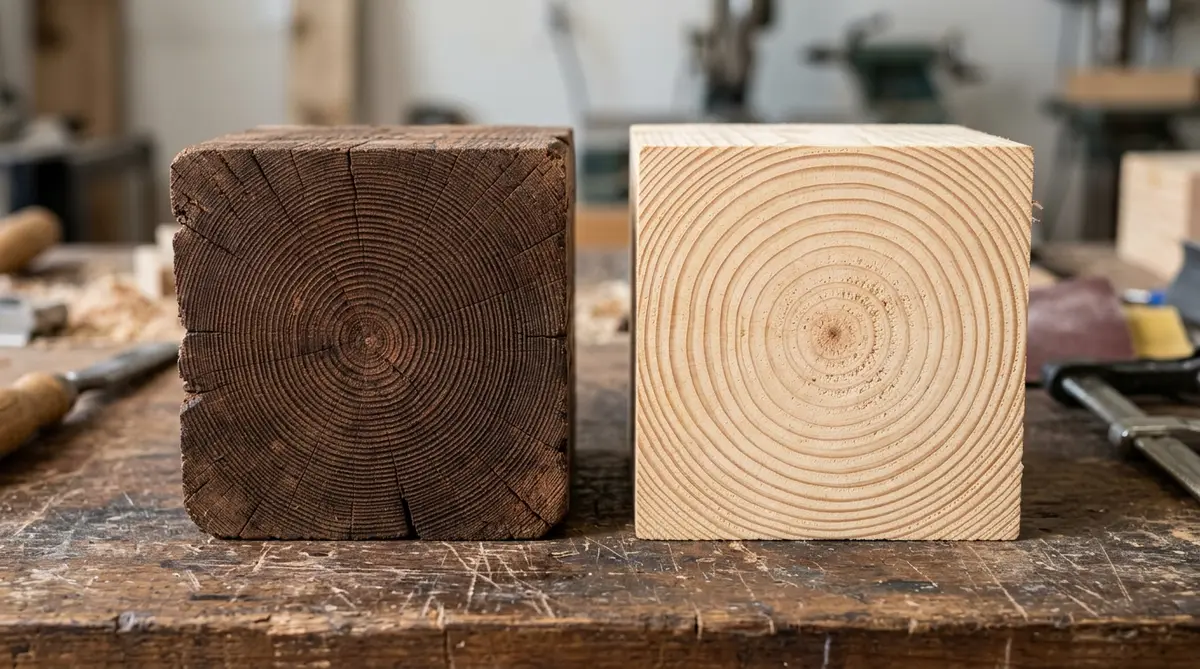
Growth ring density gives you the best proof of real antique wood. Cut boards show round annual growth rings on their cut ends. Each visible ring shows one full year of tree life. Tight rings prove the wood grew in wild old forests.
The Twenty Ring Per Inch Benchmark
Hold a tape measure against the end grain of the board. Count how many individual growth rings fit into one single inch. Real reclaimed woods like longleaf pine, white oak, and Douglas fir show fifteen to thirty rings per inch. Wild forest trees fought for sunlight, adding only a thin wood layer each summer.
Modern farm trees grow in open fields with chemical plant food. These young trees grow so fast that they make wide, soft growth rings. Modern building pine has only three to six rings per inch. If your rustic board shows wide rings over one-eighth inch thick, you have modern farm wood.
Proof Test 4: Spot Natural Weather Checking vs Fake Machine Distressing
Natural weather splits create real cracks that follow the grain lines of the board. Decades of rain, freeze cycles, and hot sun stretch and shrink wood cells. Real age cracks taper naturally into fine hairline points along the board face.
How to Detect Counterfeit Distressing Marks
Inspect lumber surfaces for repeated impact marks. Shady makers try to copy decades of barn wear by beating new pine boards with steel chains, hammers, and wire brushes. These tools leave clear signs on the board face:
- Look for identical dent groups that repeat every two or three feet along the board.
- Check for blunt marks where chain links hit across the grain and crushed soft wood fibers.
- Examine wire brush marks that cut deep into soft summer grain while leaving hard winter lines untouched.
- Look for pale raw wood fibers showing inside fresh dents beneath dark wipe-on stains.
Real reclaimed wood wears down smoothly from wind, rain, and foot steps. Knots and hard resin zones stand up higher than the surrounding wood face because hard resin fights weather wear. Sanded fake boards look flat with sharp gouges put on top.
Proof Test 5: Verify Timber Weight and Check for Active Powderpost Beetles
Authentic reclaimed wood feels heavy when you pick it up. Dense wood cell walls and dried sap give old heartwood twenty percent more weight than new lumber of the exact same size. If a long rustic board feels light like balsa wood, it lacks real antique heartwood strength.
Identifying Powderpost Beetle Exit Holes
Check the surface of salvage lumber for tiny pinholes about one-sixteenth inch wide. Powderpost beetles live inside old barn wood. While old bug holes look rustic, live bugs can eat your home floors and wall studs. Tap the board hard against a concrete floor. If fresh yellow wood dust falls out of the holes, live bug larvae are eating inside the wood.
Demanding Kiln Heat Treatment Records
Buy reclaimed wood only from certified salvage yards that heat dry every batch. Good drying kilns bake old timbers to one hundred and thirty-three degrees for four hours. This high heat kills all live bugs, insect eggs, and mold spores. Heat drying also lowers wood moisture to eight percent, stopping boards from shrinking in warm living rooms.
How to Test Reclaimed Wood for Lead Paint and Toxic Finishes
Historic barn wood often carries old paint with high lead levels. Pre-1978 buildings used lead oil paint on siding, doors, and trim. If you sand lead paint indoors, you fill your room with toxic lead dust that harms children and pets. Test painted boards before you cut or sand them.
Buy an EPA-approved lead test swab from your local hardware store. Scrape a small notch into the old paint with a clean blade to expose all paint layers. Rub the wet chemical swab across the cut notch for thirty seconds. If the swab tip turns red, the wood has lead paint. Seal lead-painted wood with a clear flat binder coat, or hire a certified lead abatement team to plane the surface clean.
How to Acclimate Reclaimed Boards Before Indoor Installation
Never install salvage wood on walls the day you bring it home. Old wood absorbs moisture from damp outdoor storage yards. If you nail damp boards to your living room drywall, the timber will shrink as it dries under indoor heating. Shrinking boards leave gaps between planks and pull nails out of wall studs.
Stack your wood planks inside the room where you plan to install them. Place thin wood sticks called stickers between each plank layer so air flows freely around all board faces. Let the wood rest in the heated room for fourteen days. Use a digital pin wood moisture meter to check the boards. Install the timber only when moisture drops below nine percent.
Reclaimed Wood vs Distressed Fake Lumber Comparison
Use this physical guide to check salvage wood boards before you pay a deposit at the lumber yard:
| Inspection Feature | Authentic Reclaimed Wood | Distressed Modern Fake Wood |
|---|---|---|
| Growth Ring Count | 15 to 30 tight rings per inch | 3 to 6 wide, soft rings per inch |
| Saw Cut Marks | Curved radial arcs or vertical sash lines | Flat planer ripples or wire brush cuts |
| Fastener Holes | Square nail holes with dark black halos | Round drilled holes with brown paint stain |
| Surface Wear | Soft natural erosion with raised wood knots | Repeated chain dents and sharp chisel marks |
| Timber Weight | Heavy, dense heartwood with dried pitch | Lightweight, soft modern pine lumber |
| Indoor Stability | Very high; stays flat in heated rooms | Poor; twists and bows under dry air |
Frequently Asked Questions About Identifying Reclaimed Wood
How do you tell if wood is really reclaimed?
Check the end grain for twenty tight growth rings per inch. Look for curved circular saw lines, real square nail holes, and dark iron oxide stains that soak deep into the natural wood grain cells.
Does real reclaimed wood have bugs or mold?
Raw barn timber often holds live powderpost beetle larvae and mold spores. Always buy kiln-dried reclaimed wood heated to 133 degrees Fahrenheit. Proper kiln heat kills all active bug eggs, larvae, and mold spores completely.
Can you fake circular saw marks on new wood?
Some makers use computer saw blades to cut fake marks into new wood. These fake cuts show identical depth and spacing. Real historic saw marks vary in depth because mill workers pushed logs by hand at uneven speeds.
Why is authentic reclaimed wood more expensive than new lumber?
Salvaging old timber takes hand building teardown, manual de-nailing with metal wand tools, long kiln drying, and careful custom cutting. This hard physical work increases lumber production costs far above automated modern tree mills.
Should you seal reclaimed wood before using it indoors?
Apply a flat water-based sealer or hardwax oil to protect the wood surface. Clean sealing traps old dust and loose splinters while keeping the soft gray-brown patina without making the wood look like shiny modern plastic.
Final Decorator Advice on Sealing and Preserving Reclaimed Wood
Protect the historic patina of your salvage timber by cleaning boards with care. Clean raw planks using a firm nylon bristle brush and warm water mixed with mild soap. Never use pressure washers on old wood. High water pressure tears soft summer grain, leaving the wood fuzzy and stripped of color.
Let cleaned planks dry inside for three full days before you build. Coat the dry wood with a flat penetrating wax oil. Natural wax oils feed dry wood fibers from within without leaving a thick film on top. Take time to check your timber proof signs so you add genuine architectural history to your home.